Tuesday, October 8, 2013

Remodel Job

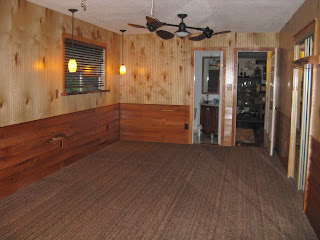
This was a much needed remodel job that our bedroom needed.
We didn't look forward to living in our guest room on a full-size bed
for 3 months, but we managed. Good thing were not large people.
I don't have before pictures, but believe me the 20 year old
wall paper was time to go, as well as the white bi-fold closet doors etc.
The wainscot is a 5/16" cherry lap siding that I did, I didn't want it to look to bulky.
All the trim is cherry including the live edge window seals
and wall mounted shelf for our TV.


A new bed was in order, photos aren't great as I had to take them looking thru the mirror,
But I used small cedar logs for the corner-post and a couple of large cedar slabs to connect them.
There are bi-passing doors on the sides for storage.
Our previous bed also had storage under it so we continued with the idea.


NEW LIFE FOR A BELL TOWER PULLEY

Alright
This was a fun job that I looked forward to.
This bell tower pulley was possibly made in the late 1800's
and sat atop in the steeple of the old 1st Presbyterian church
on Chestnut St, in Dunnellon. They were doing a complete remodel /restoration
job to the Church and this Pulley was a wreck, the cast iron spoke was terribly rusty,
and the wood which was poplar was coming apart.
They originally took it to the cabinet shop on the south side of town, and was directed
to bring it to me.
The pulley was 48" in diameter, the plan was to get the spoke out of there and grind
as much rust off of it and then sandblast it, when I was done it was metal grey.
Then good quality Rust-oleum primer was applied and the Rust-oleum black paint.
Now I could begin the woodwork
 I used White Oak, as it is the wood of choice for wet applications, such as whiskey kegs,
 wine barrels, beds of early pick up trucks, and ancient ship building.
 
 
Let the woodworking begin.
The oak was surfaced to 7/8" thick and straight line to 6" wide
and 28 1/4" long, 12 pieces cut with 30degree ends and grooves cut for splines.


Glue time, then the layout for the 48" outside radius
and the 21 3/16 inside radius.
 
Cut time, I left one spline unglued so I could enter the inside
to cut the inner radius.
 
 
Sanding to make it consistent.
 
 
Cutting the channel for the rope.
 
 
Fitting for glue-up.
 
 
In Clamps.
 
 
The finished product.
Glued and Stainless Steel Bolts


A SIMPLE POUTING CHAIR

O.K. It's been a while, and time to put a few things up here.
 This lil childs pouting chair is made of Black Oak. Locally grown Oak.
 This oak can grow to height's of 90' and 30" in diameter at the base.
This log was not that large, but it sure did yield some beautiful wood.
 We just recently had a new grandbaby born on 6/7/2013
This Chair I built for her. The log was a bit diseased and
with that, there is some spalting occurring, so I positioned the wood to take the most advantage of the spalting.
A friend brought over his chair which was of pine construction, I took a few pictures and that was all I needed to build a replica except with my own twist.
Just a natural lacquer clear coat is all I needed for the finish.
 

Thursday, February 14, 2013

ENTERTAINMENT CENTER MAKEOVER

O.K. It's been a little while, but I have a good customer whom I've built a cross legged table for them, a while back, and they came to me with a challange of modifying there Entertainment center.
 It was of an older design where your analog, 36" tube type TV fit snuggly inside, and the doors could be drawn and closed to cover the TV.
   They wanted to up grade with the times and replace the ole antique with a digital flat screen.
Well what do you do with the old Entertainment center, pitch it? Give it away?
 I Looked at it and heard there idea about cutting it off here, and bringing the top down to this level.
 Well after about a half  hour of examing, the piece, I decided it was doable, and I wasnt gonna take it on if I couldn't make it look like it had never been touched.
   Not only did I have to carefully dismantle a big part of it, so that it could be cut down, and some of the face frame had to be cut at given points, exact.
   I had to cut down the left door, which in old times, covered and displayed some of the old components or nick nacks.
 After sucessfully lowering the cabinet into it's new look, it was time to take on the door. I removed the glass, then cut the top rail out, then extracted the raised panel, then cut the door frame down to it's new size. Then I cut the raised panel down to it's new size, but now I had to figure out how to put that old style profile on the panel. That was figured out, the some pretty close matching stain did the job, and reassemble the door and hang it.